Image Captioning with Tensorflow
A picture is worth a thousand words, it says…
When you’re feeling nostalgic, you may want to scroll your collection of pictures in your Gallery or Instagram feed, because it captured what you’re doing on those beautiful days. Or, if you need to explain something, you may need graphs or image for better explanation. So, yes, pictures can help us communicating better.
Oftentimes, we can easily interpret a picture, but for some cases, pictures need to be interpreted by machines, such as when providing description to people with some difficulties. This time, I and my friend worked on a project to teach the machine how to create a caption when given a picture.
Data Overview & Pre-processing
Dataset Overview
Dataset used for this project is taken from Flickr8K at Kaggle. This dataset contains 8000 images, each provides 5 captions.
Link for the dataset: https://www.kaggle.com/shadabhussain/flickr8k


Image Feature Extraction
Dealing with the images, we extract the image features by applying ResNet50. We also omit the last layer (which is the softmax layer) because we only need to extract the features, not to classify the images. Besides that, we also do transfer learning by using the weights from ImageNet. ImageNet has been trained over 14 million images and has been grouped into specific categories and sub-categories. We hope that it can help the model identifying the objects for better captioning.
import tensorflow as tf
from keras.preprocessing import image
from tensorflow.keras.applications.resnet50 import ResNet50
from tensorflow.keras.applications.resnet50 import preprocess_input
import os# Get all filenames of the images
folder = "../input/flickr8k/Flickr_Data/Flickr_Data/Images/"
images = os.listdir(folder)# Load the CNN Architecture with Imagenet as weights
image_model = ResNet50(weights='imagenet')
model_new = tf.keras.Model(image_model.input,image_model.layers[-2].output)# Store image features in dictionary
img_features = dict()
for img in images:
    img1 = image.load_img(folder + img, target_size=(224, 224))
    x = image.img_to_array(img1)
    x = np.expand_dims(x, axis=0)
    x = preprocess_input(x)

    fea_x = model_new.predict(x)
    fea_x1 = np.reshape(fea_x , fea_x.shape[1])
    img_features[img] = fea_x1
After executing the code, the output would be a 1x2048 vector for each image, containing the features from the images.
While working on this, I and my friend also tried simple or basic CNN to extract the features from those images. We want to know how good it would be when using basic CNN models. This model also generates 1x2048 vectors. Here is the model that we’ve created.
model = tf.keras.models.Sequential([
 tf.keras.layers.Conv2D(64, (3, 3), activation=’relu’,
          input_shape=  (224, 224, 3)),
 tf.keras.layers.MaxPooling2D(2, 2),
 tf.keras.layers.Conv2D(64, (3, 3), activation=’relu’),
 tf.keras.layers.MaxPooling2D(2, 2),
 tf.keras.layers.Flatten(),
 tf.keras.layers.Dense(128, activation=tf.nn.relu),
 tf.keras.layers.Dense(2048, activation=tf.nn.softmax)
])
Later, we’ll compare the result of ResNet50 and this basic CNN models…
Caption Pre-Processing
The first thing we have to do is gather all of the captions from Flickr8k.Token.txt and group them by a single key, which is the filename. After that, we split the captions for train, validation and test sets according to Flickr_8k.trainImages.txt, Flickr_8k.devImages.txt, and Flickr_8k.testImages.txt. Those three files only contain the filenames for respective dataset. While splitting the captions based on those files, we also add ‘Startseq’ at the beginning and ‘Endseq’ at the end of the sentence to each caption. This is to signal when the model should start writing or stop predicting next word at training phase.
# Get All Captions
fn = "../input/flickr8k/Flickr_Data/Flickr_Data/Flickr_TextData/Flickr8k.token.txt"
f = open(fn, 'r')
capts = f.read()
#Group all captions by filename, for references
captions = dict()
i = 0

try:
    for line in capts.split("\n"):
        txt = line.split('\t')
        fn = txt[0].split('#')[0]
        if fn not in captions.keys():
            captions[fn] = [txt[1]]
        else:
            captions[fn].append(txt[1])
        i += 1
except:
    passModel def getCaptions(path):

    f = open(path, 'r')
    capts = f.read()
    desc = dict()

    try:
        for line in capts.split("\n"):
            image_id = line
            image_descs = captions[image_id]

            for des in image_descs:
                ws = des.split(" ")
                w = [word for word in ws if word.isalpha()]
                des = "startseq " + " ".join(w) + " endseq"
                if image_id not in desc:
                    desc[image_id] = list()
                desc[image_id].append(des)
    except:
        pass

    return desc# Split captions
train_caps = getCaptions("../input/flickr8k/Flickr_Data/Flickr_Data/Flickr_TextData/Flickr_8k.trainImages.txt")
val_caps = getCaptions("../input/flickr8k/Flickr_Data/Flickr_Data/Flickr_TextData/Flickr_8k.devImages.txt")
After that, we have to tokenize the captions from the train set and get the word-index & index-word dictionaries from that. The word-index dictionary is meant to represent the captions as a number to be inputted to the model, while the index-word is to convert the next word/prediction to the word form, as we know it.
from keras.preprocessing.text import Tokenizer# Preparing to make word-index and index-word
train_captions = []
for key, desc_list in train_caps.items():
    for i in range(len(desc_list)):
        train_captions.append(desc_list[i])

# Tokenize top 5000 words in Train Captions
tokenizer = Tokenizer(num_words=5000,
                      oov_token="<unk>",
                      filters='!"#$%&()*+.,-/:;=?@[\]^_`{|}~ ')
tokenizer.fit_on_texts(train_captions)
word_index = tokenizer.word_index
index_word = tokenizer.index_word
Also, don’t forget to split the extracted image features to train, dev and test sets.
train_fns = list(train_caps.keys())
train_set = dict((k, img_fea[k]) for k in train_fns)
val_fns = list(val_caps.keys())
val_set = dict((k, img_fea[k]) for k in val_fns)fn_test = "../input/flickr8k/Flickr_Data/Flickr_Data/Flickr_TextData/Flickr_8k.testImages.txt"
f = open(fn_test, 'r')
t = f.read()

test_fns= t.split("\n")
test_set = dict((k, img_fea[k]) for k in list(test_fns[:-1]))
Training the Data
Data Representation to The Model
Here comes the complex part. First, how do we feed the model with these data, since there are two types of data (images and captions)?
Recall to the image feature extraction, the images now have all become a vector with length of 2048. The captions also have been tokenized. The extracted image features will be appended to the caption that has been sliced. Maybe, it’s better to explain with example… Say, we have this image and the caption:

The caption has to be appended by ‘startseq’ and ‘endseq’, and tokenized. Let’s say this is the word-to-index dictionary that has been generated.
- startseq: 1
- endseq: 2
- five: 10
- people: 3
- are: 5
- running: 90
The data fed to the machine would be like this:
X1 : [1X2048 Image feature],[1, 0, 0, … , 0] (1 is for 'startseq')
y1 : 10 (10 is for 'five')X2 : [1X2048 Image feature],[1, 10, 0, … , 0] (append last output/next word in the caption to the input)
y2 : 3 (3 is for 'people')X3 : [1X2048 Image feature],[1, 10, 3, 0, … , 0] (again, append last output/next word in the caption to the input)
y3 : 5(5 is for 'are')X4 : [1X2048 Image feature],[1, 10, 3, 5, 0, … , 0] (again, append last output/next word in the caption to the input)
y4 : 90(90 is for 'running')X3 : [1X2048 Image feature],[1, 10, 3, 5, 90, 0, … , 0] (again, append last output/next word in the caption to the input)
y3 : 2(2 is for 'endseq')
In short, there would be two vectors fed into the input. One is the extracted image features and the other is the sliced caption represented in number. The output, which is the next word in the caption, also is represented in number.
The captions can have different length, even for the same image. To handle this, the sliced caption has to be padded with zero, to the length of the longest caption in the train set.
Word Embedding
For this project, we used GloVe Word Embedding for the captions. Every word in the dictionary will be mapped into a vector from the pre-trained GloVe model. The dimension of GloVe we used is 200.
According to GloVe website, GloVe has been modeled by how frequently a word is coming up after another word. So, we expect that the predicted caption can be improved with this.
# Load Glove vectors
embeddings_index = {} # empty dictionary
f = open("../input/glove-global-vectors-for-word-representation/glove.6B.200d.txt", encoding="utf-8")

for line in f:
    values = line.split()
    word = values[0]
    coefs = np.asarray(values[1:], dtype='float32')
    embeddings_index[word] = coefs
f.close()
print('Found %s word vectors.' % len(embeddings_index))# Get 200-dim dense vector for each of the 10000 words in out vocabulary
vocab_size = len(word_index) + 1
embedding_dim = 200
embedding_matrix = np.zeros((vocab_size, embedding_dim))

for word, i in word_index.items():
    #if i < max_words:
    embedding_vector = embeddings_index.get(word)
    if embedding_vector is not None:
        # Words not found in the embedding index will be all zeros
        embedding_matrix[i] = embedding_vector
First, we collect all the words in GloVe and their coefficients. Then, we map all the words in our dictionaries before to a vector and collect all of them into a matrix (embedding matrix)
Model Architecture
max_length = 34
image_model = Sequential()

image_model.add(Dense(embedding_dim, input_shape=(2048,), activation='relu'))
image_model.add(RepeatVector(max_length))

language_model = Sequential()

language_model.add(Embedding(input_dim=vocab_size, output_dim=embedding_dim, input_length=max_length))
language_model.add(LSTM(256, return_sequences=True))
language_model.add(TimeDistributed(Dense(embedding_dim)))

conca = Concatenate()([image_model.output, language_model.output])
x = LSTM(128, return_sequences=True)(conca)
x = LSTM(512, return_sequences=False)(x)
x = Dense(vocab_size)(x)
out = Activation('softmax')(x)
model_1 = Model(inputs=[image_model.input, language_model.input], outputs = out)

model_1.layers[2].set_weights([embedding_matrix])
model_1.layers[2].trainable = False

model_1.compile(loss='categorical_crossentropy', optimizer = Adam(learning_rate = 0.0001), metrics=['accuracy'])
For the model architecture, there are two parts at the beginning. The first one is handling the image feature (image_model), which consists a Dense layer and RepeatVector. The second part is the one handling the captions (language_model). At the first layer of language_model, there is an Embedding layer, which weight will be assigned by the GloVe coefficients we have gathered before in embedding_matrix. We also set that layer to be untrainable, since it has been pre-trained before.
Next, the image_model and language_model are concatenated to predict the next word (output). For the next-word prediction part, there are 2 layers of LSTM followed by a Dense and Softmax layer for classification (since this case is a multi-class classification anyway).
Results
We’re comparing the result between basic CNN architecture without word embedding versus advanced CNN architecture & GloVe.

Besides basic CNN and ResNet50, we also extract the images with InceptionV3. According to the result, with more advanced CNN architecture and word embedding, the performance is better, with 1 point drop of loss in the train set and validation set. For the accuracy, in train set it is increasing by 8–14%, while in validation set, only increasing by 3%.
There is a metric introduced here called ‘BLEU’. What is BLEU Score?
BLEU stands for Bilingual Evaluation Understudy, that evaluates a candidate of translation with some references. Although at first used for translation, this score is now commonly used for other NLP purposes. For perfect match, the score would be 1, and for the perfect mismatch, the score is 0.
For the result above, BLEU score is better when using InceptionV3. In short, with more advanced CNN, the BLEU scores are increasing by 2–4%.
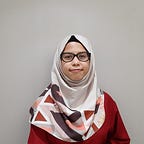
Test on Images
So, let’s test on images! Below, the pictures are tested with ResNet50 & GloVe.


Room for Improvements
While we were working on this case, there were some ideas that we thought could improve the performances:
Adding varieties to the dataset
We noticed that most object appearing in dataset is either human or dog. Once we tested on cats, it predicted on dog for the caption. We were curious and found that cats only appeared 61 times in the captions, while dogs appeared for 1000 times!
We also notice that the captions always start with humans/animals, followed by verbs. Once we tested on a picture of high rises taken from higher floor, the prediction started with ‘People’, while in the picture there was nobody. We thought perhaps the captions should be more varied.
The verbs predicted in this case are not really various (there are also chances we haven’t tested it to more pictures). The most appearing verbs are: standing, running, sitting, playing, climbing. When we submitted a person sleeping on a bed, it said sitting on a bed instead. Perhaps, distribution of words in the dictionaries should be assessed first.
Predict better at colours and genders
Colours are often wrongly classified. When actual picture was a green shirt, the prediction said another colour. On other cases, boy was predicted as girl, woman as boy, but perhaps this depends on the pose or position in the pictures.
For this project, we refer to these links: